SOUS CHEF
Do you have what it takes to survive as a Sous Chef?
ABOUT
For NYU's Interactive Telecommunications Program's Winter Show, my team and I were asked to create a project that demonstrated an understanding of both physical and digital interaction design principles. We decided to build a children's game based on games we loved growing up.
Type
Children's Game, Physical Controller with Digital Interface
My Role
Point Person, p5 Emphasis
Collaborators
Sharan Mohanadoss (Arduino Emphasis)
Wenxiao Ding (Fabrication Emphasis)
Software + Code Editors
p5 Web Editor(Javascript)
Arduino (C#)
Pixel Studio
Duration
4 weeks
Teasingly described as a lovechild of 'Bop It!' and 'Cooking Mama, "Sous Chef' is a reaction-time based game with a digital screen and a physical controller that houses many sensors and resembles an oven (think EasyBake Oven).
Within the game, you are a sous chef in charge of making sure everything is running smoothly by checking the oven, flipping food, covering pots, adjusting the stove, and ringing the bell when an order is ready. Commands will be given faster and faster and faster; keep up or you'll get fired!
Game Description
EARLY CONCEPTS
Digital Game
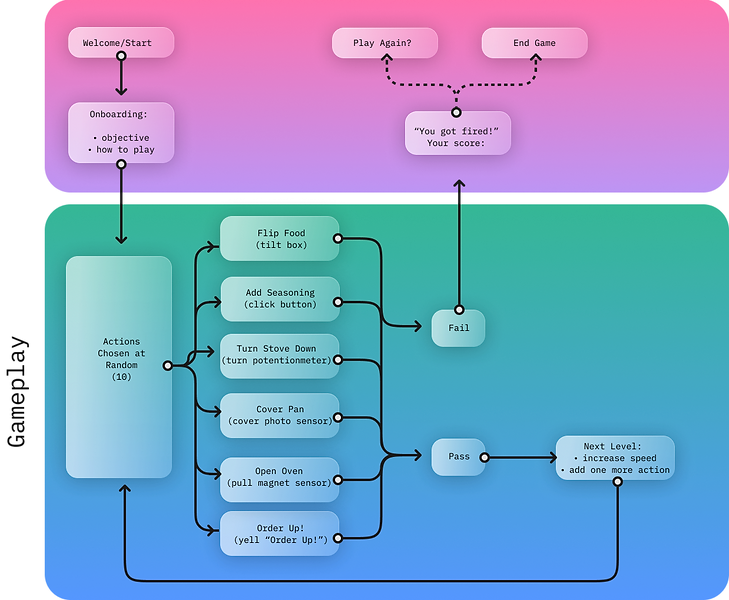
The player will be given instructions on a screen to do a given action. If the player does not complete the action using the toy oven in a certain amount of time, they lose. The time given to complete tasks will get lower and lower until the player eventually cannot keep up.
User Flow
Art
Because I am not an illustrator, I aimed for a charming, pixelated style. I created the art on an app called Pixel Studio, and uploading it all to p5 web editor.

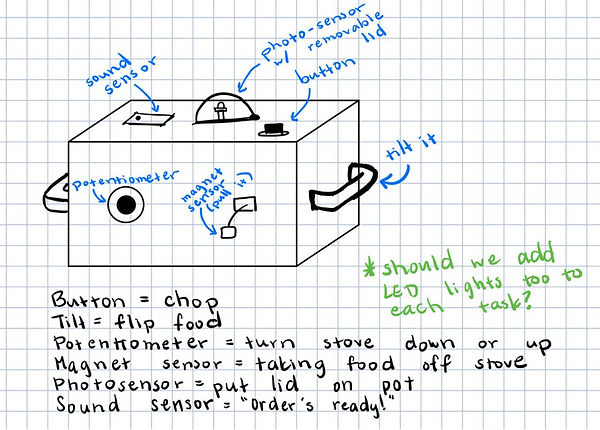
Physical Controller (Oven)
BUILDING INITIAL PROTOTYPE
Digital Game
p5 Code
At the very beginning, I was definitely overcomplicating the sketch by using classes that fed into other classes. As I went along, I found that most of the problems I ran into could be fixed by simplifying the code over and over again. I had a lot of silly mistakes that cost me hours of debugging (such as using mouseIsPressed instead of mousePressed()), and had to cut down on the amount of screens I had originally wanted to have for this first iteration.

Animation
Different assets that I layered on top of each other to make the final look:

Physical Controller (Oven)
Fabrication
The box was made using an original design made in Illustrator, put through the laser cutter, and assembled with some help from glue. My partner Ding oversaw most of the fabrication, with my other partner Sharan and I helping put everything together with the circuitry at the end.
Materials:
-
Thin wood
-
Glue
-
String

Circuit
Sharan assembled the circuit, and while all 6 of our sensors worked on their own, we had some problems after attempting to connect them to the p5 sketch. The sensors were much more sensitive than we were anticipating, and some stopped working once connected to p5.
We accommodated for this as much as we could for the first play test through careful sensor placement (and omitting a few sensors).
Materials:
-
Magnet Sensor
-
Photo Sensor
-
Push Button
-
Tilt Sensor
-
Arduino Nano
-
Breadboard
-
Wires

PLAYTESTING
We were able to test on 5 students while the rest of our class watched. We first gave the player instructions on how to play (since our first prototype did not have an instructions screen), and we observed their interaction. Afterwards, we asked about what their favorite and least favorite parts of the game were. Feedback was also given by the students observing.
Here's what we learned:
-
The box was too small and seemingly fragile, so players seemed to hold back on their movements and prioritized not breaking the box over focussing on the gameplay
-
The sensors were not intuitive since there was nothing to indicate which sensor was supposed to correspond to what action being asked of the player
-
Completing tasks were not satisfying because of a lack of strong visual feedback and no audio feedback
-
People found the game and mechanics fun!
PROTOTYPE #2 (FINAL BUILD)
Digital Game
Components added to the p5 sketch after playtesting:
-
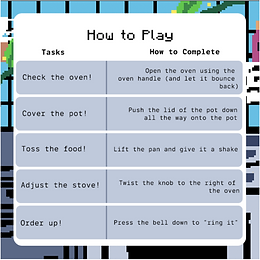
remaining screens from the user flow (start screen, objective, instructions, and game over)
-
background music
-
feedback sounds (when a task is passed)


Physical Controller (Oven)
Fabrication
Our inspiration for the second build from WonderWorldToy:

Us assembling the oven and the final result (with no circuit board inside yet):

Circuit
After a few long nights, we were able to work out the sensors and get everything attached and working with the code!
FINAL RESULT
A screen recording of what a player would see on their screen:
REFLECTION
No project has pushed me to learn as many different skills for a single project than this one. This was my first time coding and creating art for a game (and the first time doing pixel art ever), and it has been incredibly rewarding. I've learned to think about user experience outside of a digital context, specifically when working with my team to figure out the design and logistics of the oven and where its sensors would sit so that the player can interact with it comfortably and naturally.
Working within this team has also been eye opening, as we undoubtedly faced some frustrating moments together. We were all working in at least somewhat unfamiliar territory, and a lot of the efforts became about finding motivation to keep trying over and over again after parts of our project seemingly will just not work. With my teammates, I learned how to continue extending patience with our equipment and one another even when we are all at the end of our rope. I am incredibly grateful for them, and feel as if we've truly been on a journey together.